GrowthStack User Manual
Contents
- How to view Growthstack in WordPress Admin
1.1 Overview - Personalization
2.1. How to create a personalization
2.2. Personalization rules - A/B testing
3.1. How to create an A/B test
3.2. How to view the results and select the winner - Analytics
4.1. Metrics
4.2. Site analytics
4.3. Page-specific analytics
4.4. Personalization analytics
4.5. A/B-testing analytics - AI Assistant
5.1. Content editing with AI Assistant
5.2. Customizing AI prompts
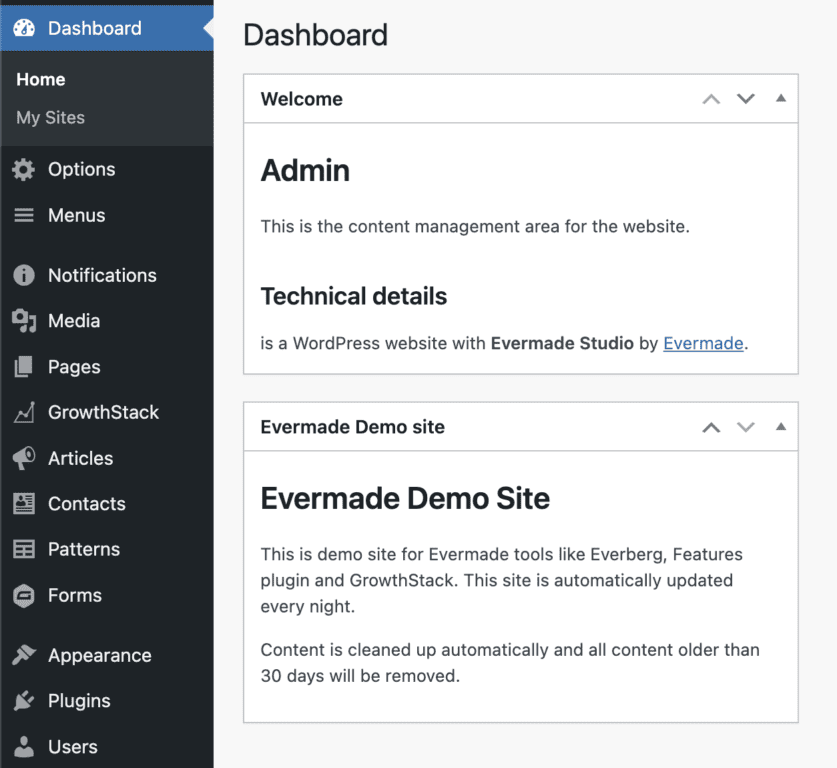
How to view GrowthStack in WordPress Admin
GrowthStack can be found in the Admin Dashboard as its own section. From here you can see the general overview of the tool but actual personalizations and A/B tests are created directly to the selected pages.
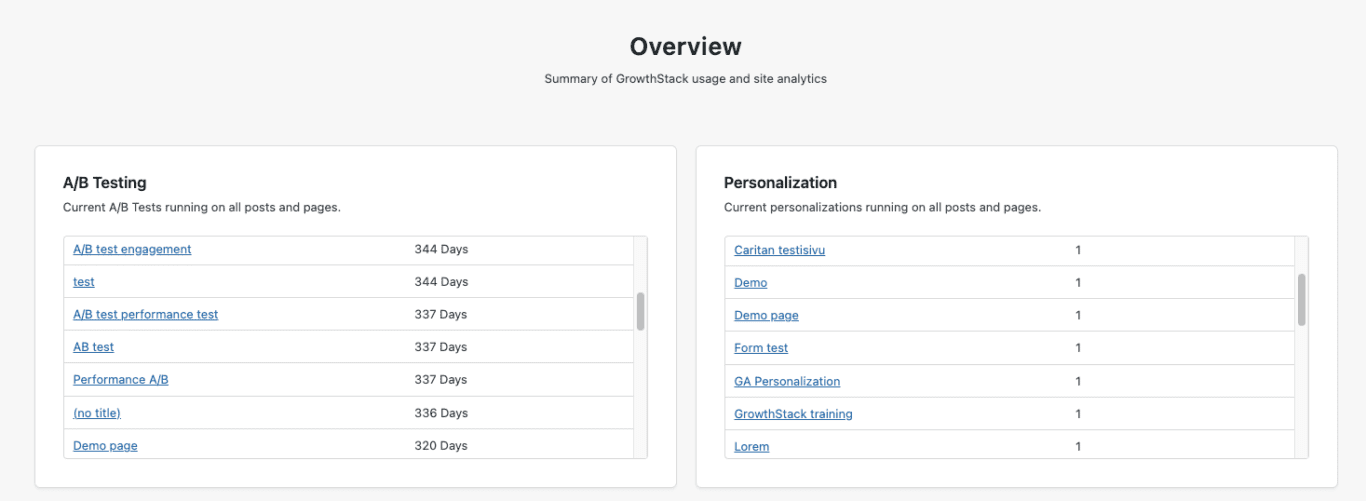
Overview
The overview offers a general overview of the GrowthStack usage on the site. There you can see:
- Personalizations running on the site
- A/B tests running on the site
- General analytics of the site
We will dive more in-depth into the analytics later in this manual.
Personalization
How to create a personalization
A personalization is created inside the editing view of the page. Open up the page and choose the content you would like to personalize. Start building the personalization by clicking the Personalize button on the top menu.
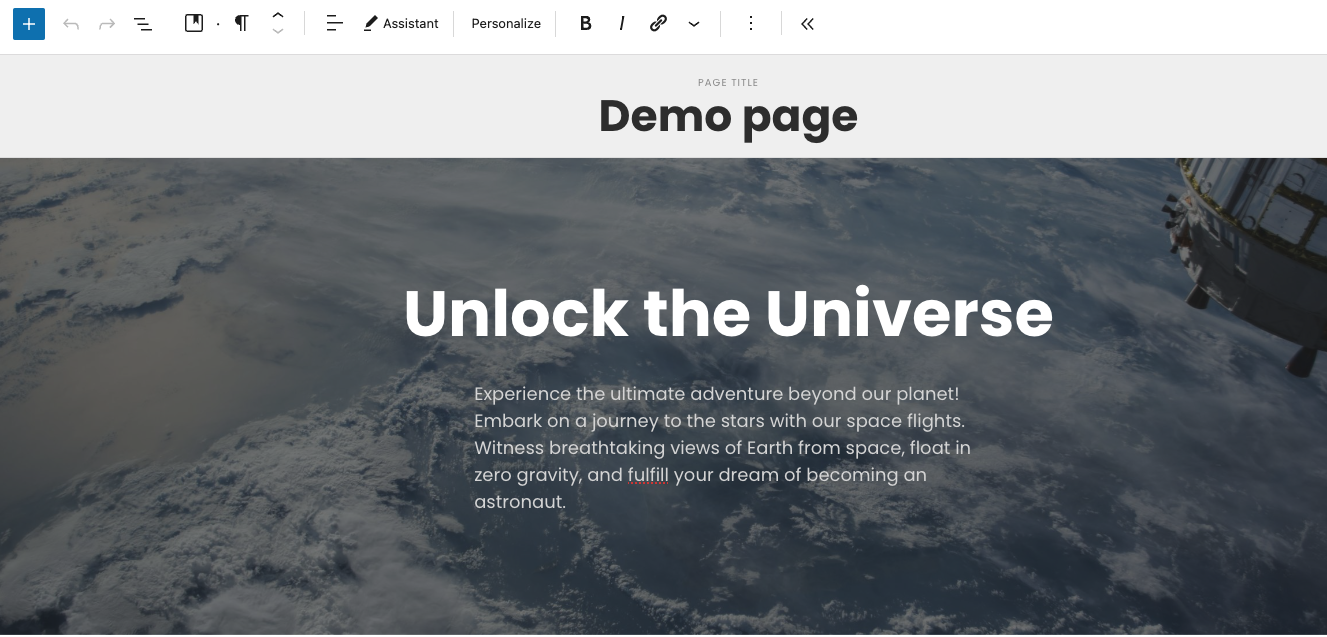
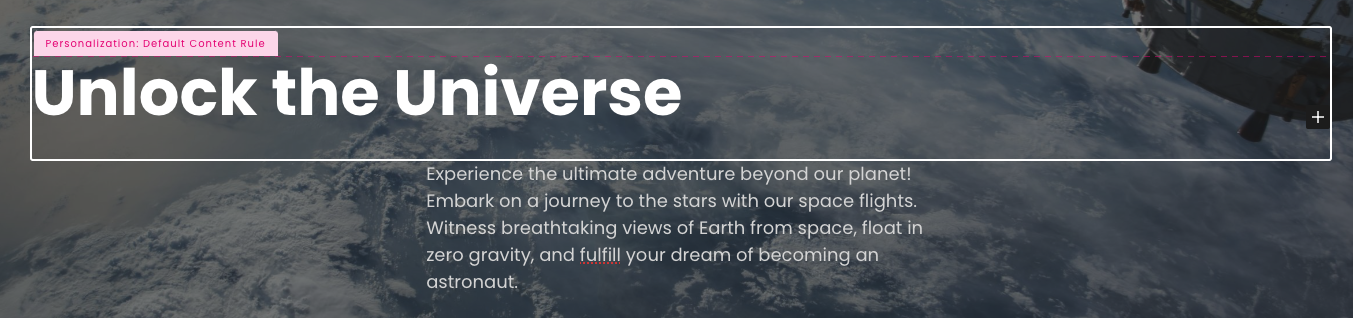
The block will be surrounded by a pink border, which means that there’s some kind of personalization in that block. The Default content is the default content of the page, which will be shown to all those users that won’t match to any other personalization rule.
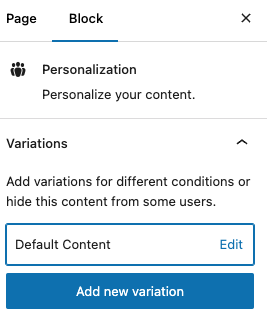
When the block is selected, new personalization rules can be defined from the menu on the right side. Rules will occur in the selected order, so the one that should trigger first should be on top of the list. Rules are checked one by one and if nothing fits the user who visits the page, they will see the default content.
Personalization rules
A new personalization rule can be added from the Add new variation button.
Start by selecting a rule from available options.
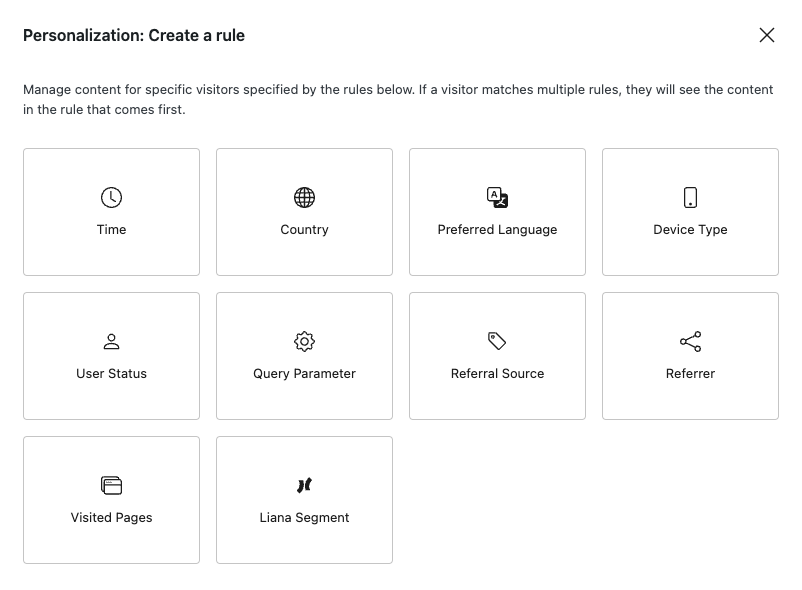
Personalization definitions depend on the rule you have selected to use. We will introduce the different rules in this manual.
Variation name is the name of your personalization and tells you which personalization rules are in use on the page.
Hide Content selection lets you define whether you want to show or hide the content from the user group applying to the rule.
Advanced info gives you extra information on how to utilize GrowthStack personalization rules in Google Analytics. This will tell you more about the actions of different types of users.

The apply rule button will add the personalization to the selected content.
After you have created a new personalization rule, it will appear in the personalization menu on the right.
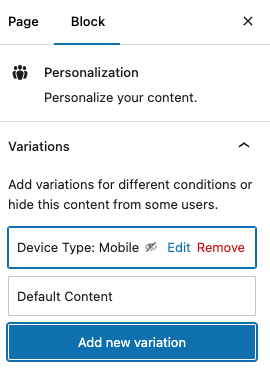
To edit the content for different rules, select one of the rules from the menu. You can see the rule highlighted after selecting it and you can edit the content as you like.
You can also check the contents of different rules by clicking them from the menu.

Default content rule selected

Personalization based on the user’s country selected
When the personalization is ready, you can publish the page. After publishing, the personalization starts running on the page.
Personalization rules
Time
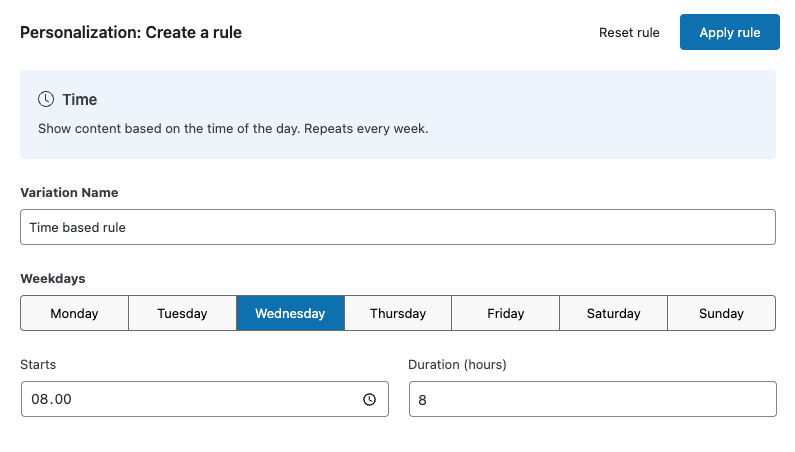
With the time-based personalization rule, you can show different content to the users who visit the site on different days or at different times of the day.
Select the dates you want the personalization to be active on, starting time, and duration.
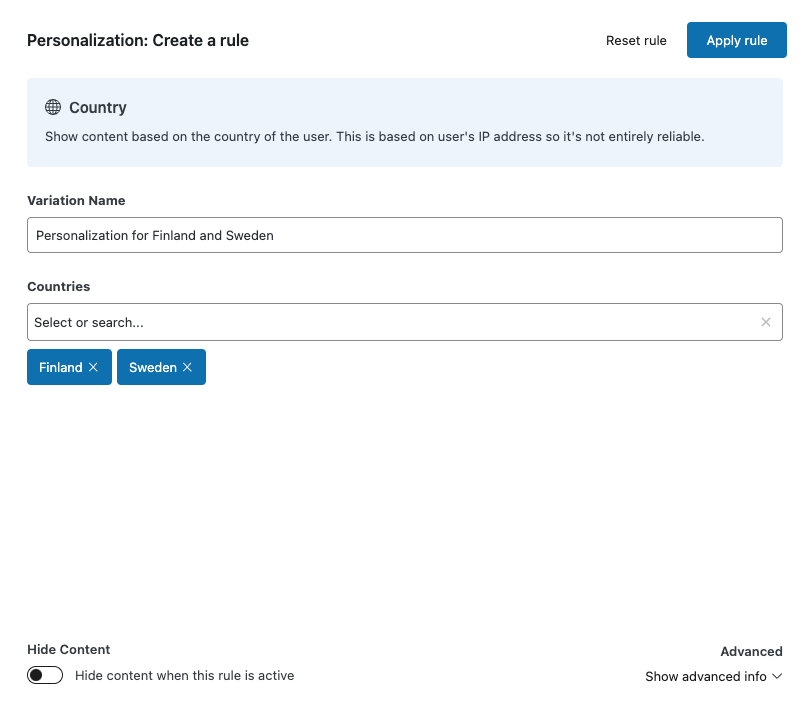
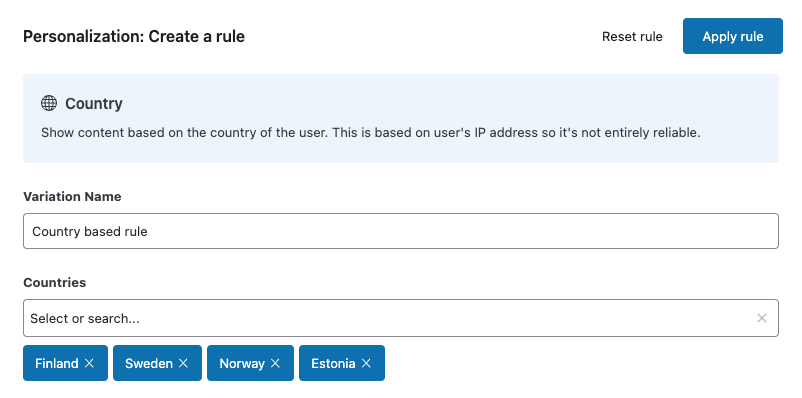
Country
With this rule, content can be personalized for users coming from different countries. You can select multiple countries on the same rule.
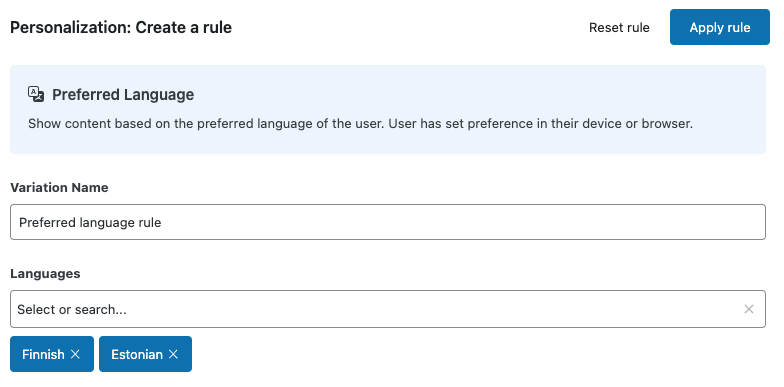
Preferred Language
Personalization is targeted based on the user’s browser or device language. You can select multiple languages.
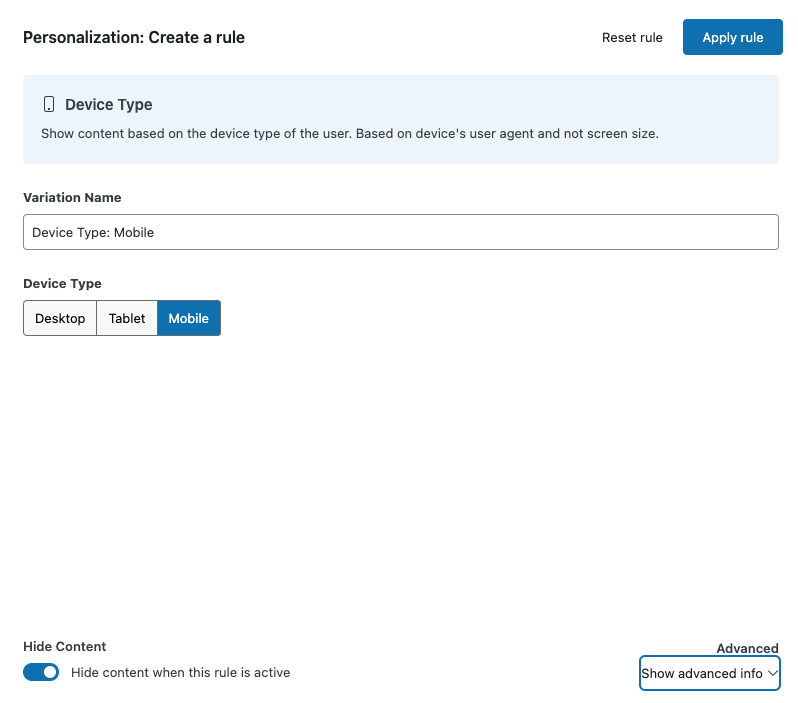
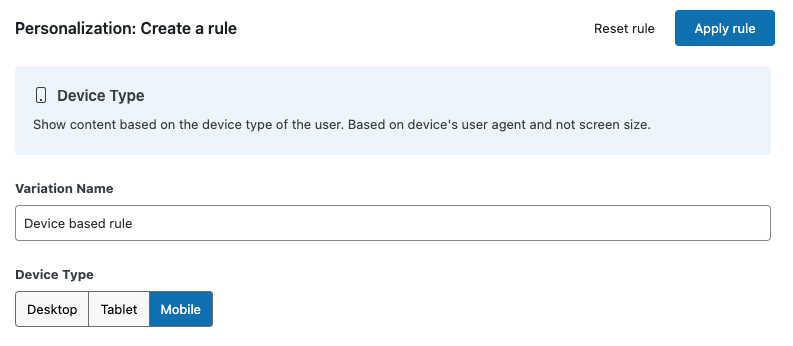
Device Type
This rule allows you to show different contents based on the devices users visit the site with. Device type options are desktop, mobile, and tablet.
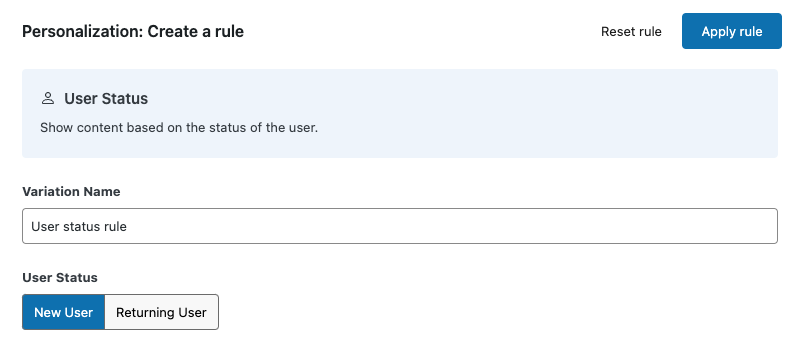
User Status
This rule allows you to target content either to new or returning users. This rule uses cookies.
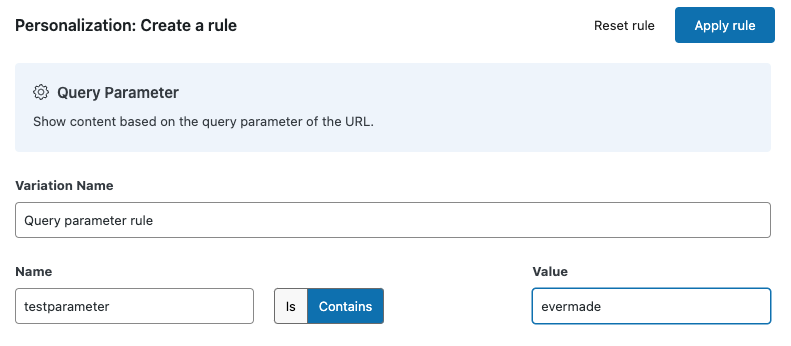
Query Parameter
The query parameter rule shows content based on different parameters in the URL address. This way you can show specific content e.g. for those users who come to the site from a certain newsletter campaign.
Insert the parameter name to the name field and in the value field define the condition you want to base the personalization on.
In the value field you can use either is or contains option. If you use ‘is’, the URL parameter value needs to exactly match the text in the value field. If you choose to use ‘contains’ it’s enough that some part of the URL parameter value matches the text in the field.
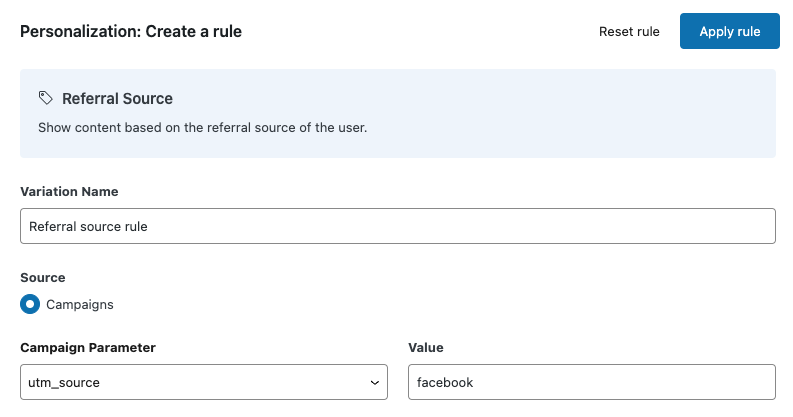
Referral source
The referral source can be used to personalize the content based on different UTM campaign parameters.
From the Campaign parameter dropdown menu, you can choose which UTM parameter to use in the personalization rule. This way you can show specific content based on certain social media or Google Ads campaigns.
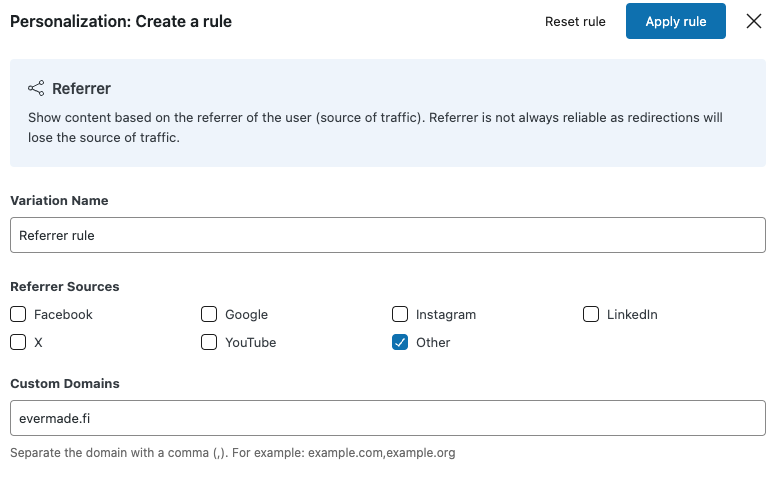
Referrer
With the help of Referrer personalization rule you can show different content for users coming from different sources. You can either choose one of the ready-made options or define you own source by selecting Other.
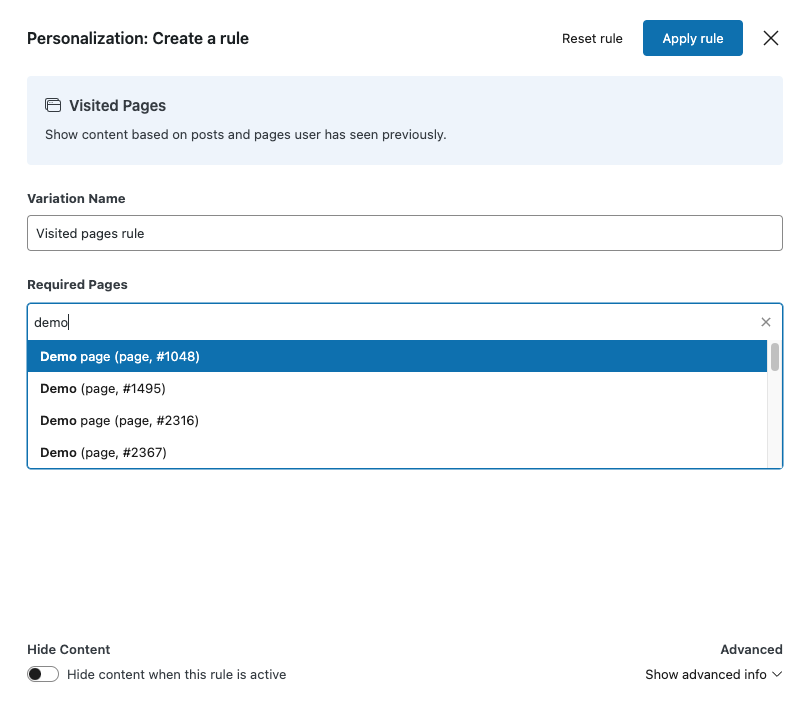
Visited pages
Visited pages rule allows you to show content based on the pages users have previously visited on your site. You can search pages based on their title or ID. It is possible to add multiple pages to the rule.
A/B testing
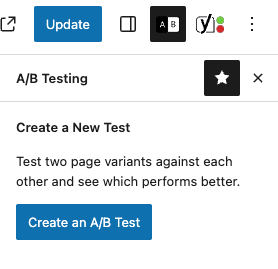
How to create an A/B test
A/B test is created on a certain page. Please note, that e.g. navigation can’t be A/B tested.
When you are in a page editor, you can find the A/B test button from the top right menu. By clicking that, you can start building the test.
Creating an A/B test will create two versions of the page: Original and Variation. Original is the original content of the page and variation is the competing version of the content where you can make the changes you want.
From the menu on the right you can check and edit the contents of each version.
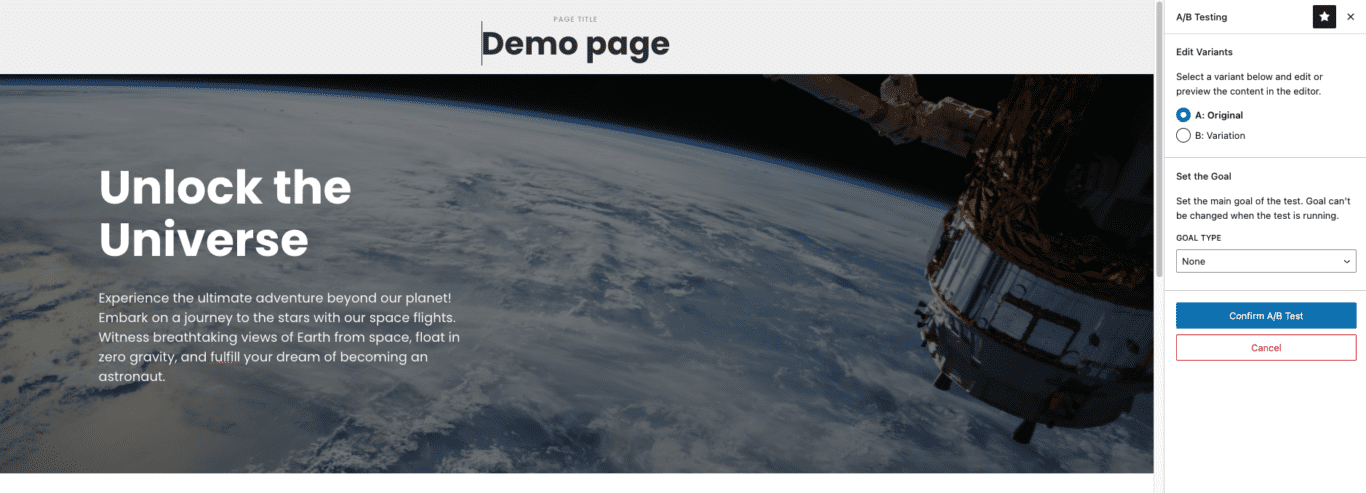
A: Original content chosen
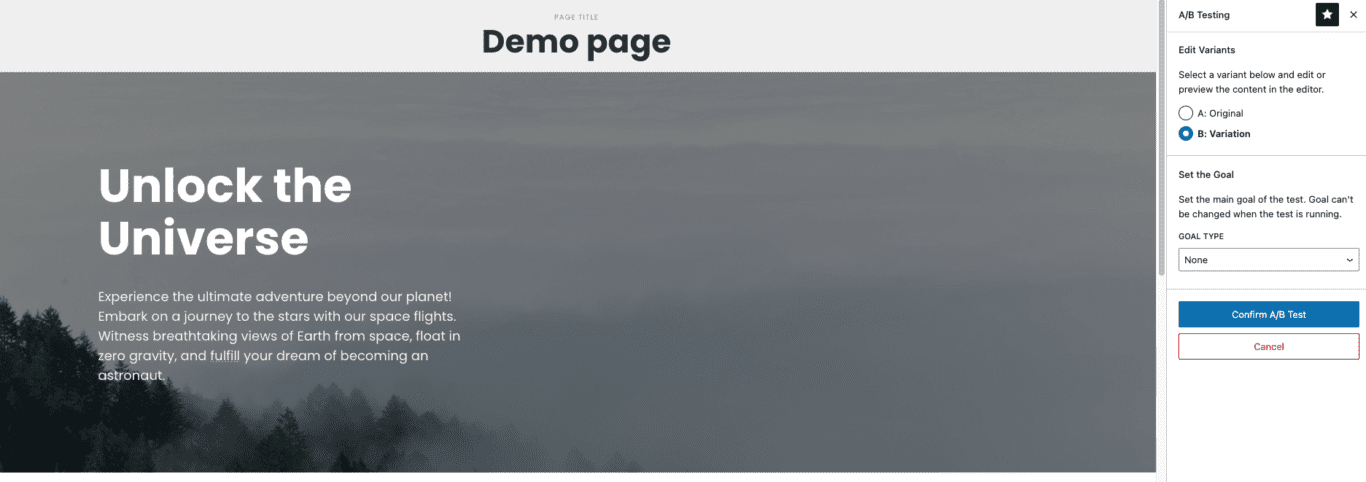
B: Variation content chosen
In order to see which of the variants is performing better, it is recommended to set up a goal for the A/B test. Currently you can set a certain page url as a goal. For example if you want to test the effect of changing a text in the CTA button, you can set the button target page as a goal. Only internal pages can be used as a goal.
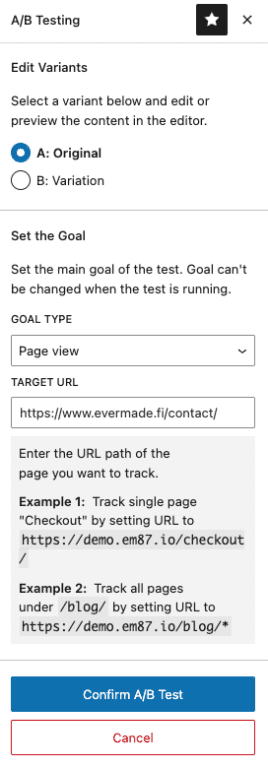
After you are happy with the contents of different variations and your goal, confirm the A/B test.
The A/B test starts running when the page is published. Half of the page visitors will see the original version and the other half will see the variation.
How to view the results and select the winner
Typically the test should run at least two weeks to get enough visits for both content versions.
The A/B test menu on the page includes a Compare results button where you can see the A/B test performance.
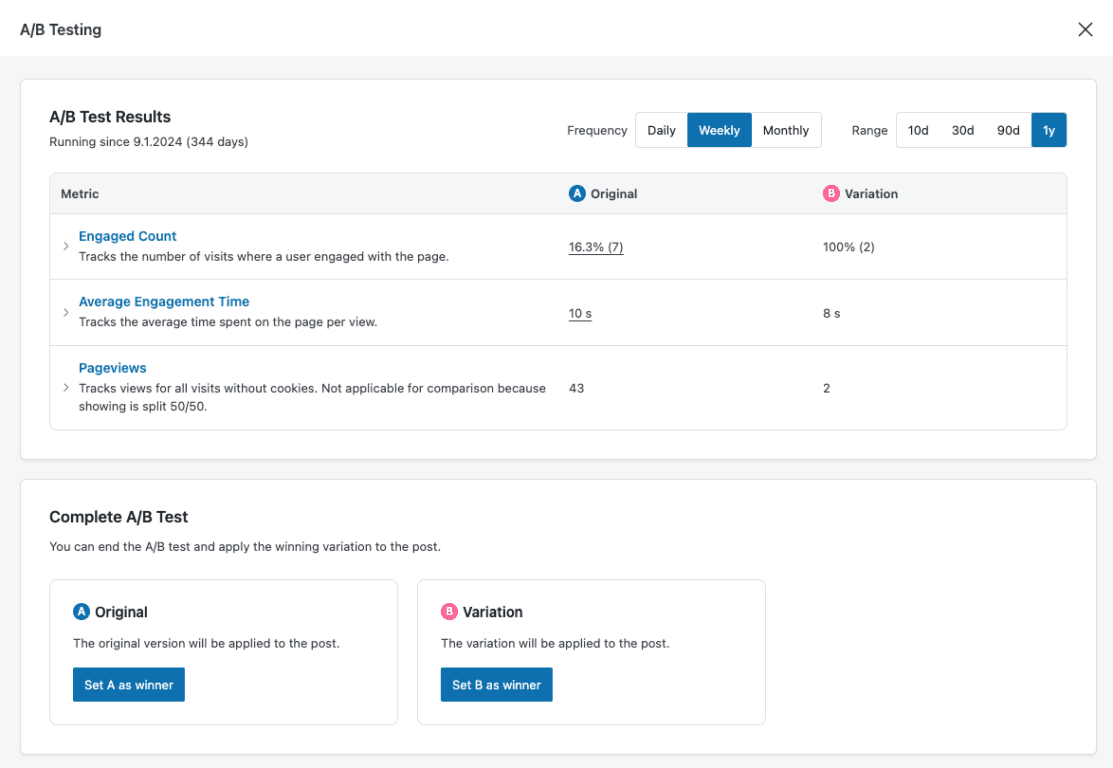
Results show how different variations have performed in the chosen time period.
The Set as Winner button will set the better-succeeded version as the winner and this version of the content will be then shown permanently on the page where the original A/B test was built. We will return to A/B test analytics later on this manual.
Analytics
There are several occasions where the analytics are shown in GrowthStack:
- Analytics of the whole site in the Overview
- Analytics of a single page that you can view from the Pages section, beside the page name
- Personalization analytics which you can view from the Pages section beside the page name
- Analytics of a single A/B test that you can access from the A/B test menu on a test page or from the Pages section beside the page name

Active buttons in the Pages section indicate if an A/B test or personalization is running on a certain page. From the first button, you can view the page analytics.
Metrics
Analytics views include several different metrics that vary a bit depending on the analytics view.
Pageviews
Pageviews tell you how many times a page has been loaded or how many pages have been loaded altogether on the site.
Users
The number of users on the site, on a single page, or in different variations of the A/B test.
Sessions
Visits on the site.
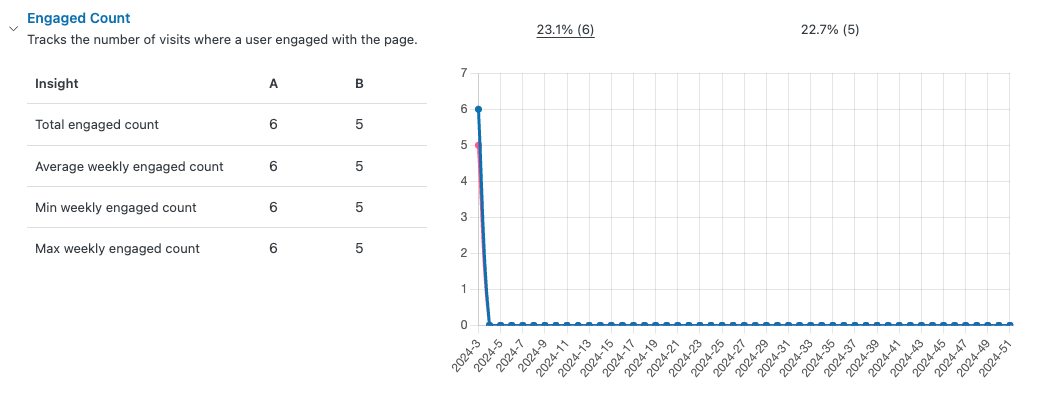
Engaged Session Count
The number of sessions that have been engaged. A session is considered engaged if the user has visited at least two pages and has spent at least 10 seconds on the site.
Engagement rate
Percentage of engaged sessions from the total number of sessions.
Average engagement time
Average engagement time on a page or in different variations of the A/B test.
Most popular pages
The most popular pages of the site and their user and view counts.
Conversion count
How many conversions (A/B test goals) each of the variant has gained during the A/B test.
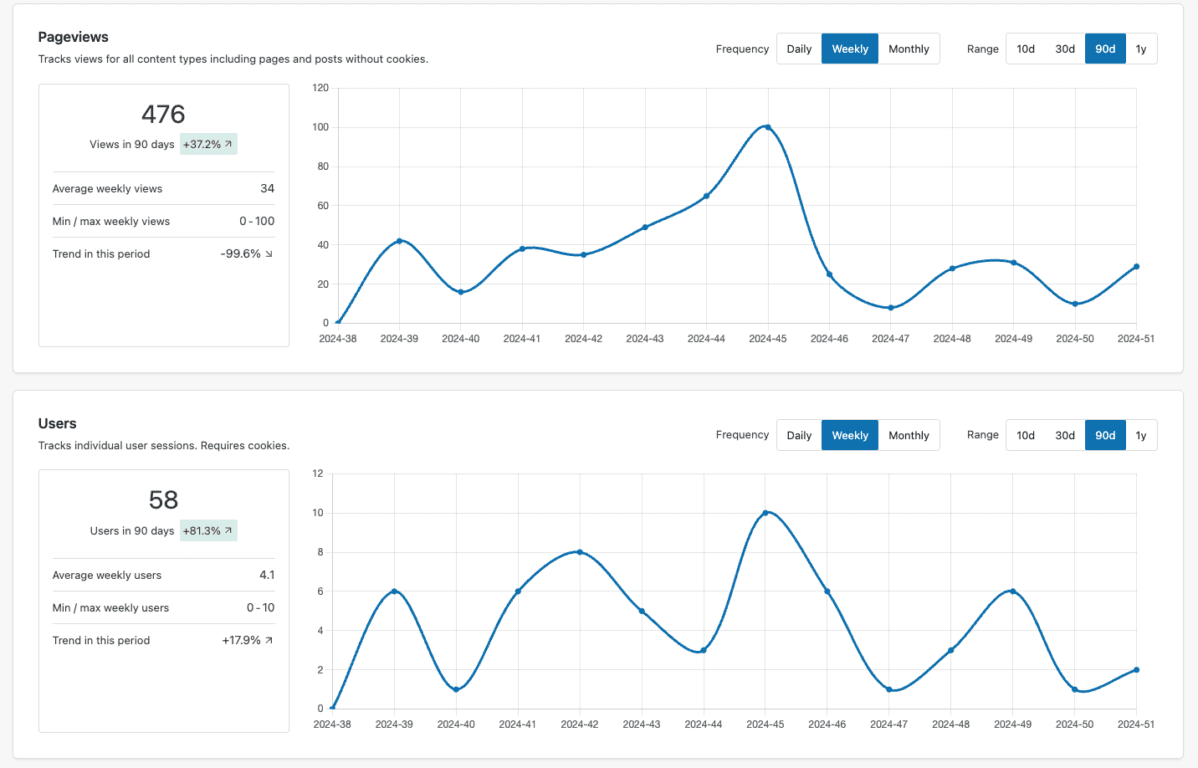
Site analytics
In the Overview section, you can view the overall performance of the entire site at a general level. It displays the following metrics: Pageviews, Users, Sessions, Engaged Session Count, Engagement Rate, and Most Popular Pages. Each of these has its own dedicated section. You can adjust the time range and frequency of analysis to suit your needs for each section.
In addition to the total figures, the metrics provide additional details, such as comparisons to the previous period, averages, minimum and maximum values, and trends within the selected timeframe.
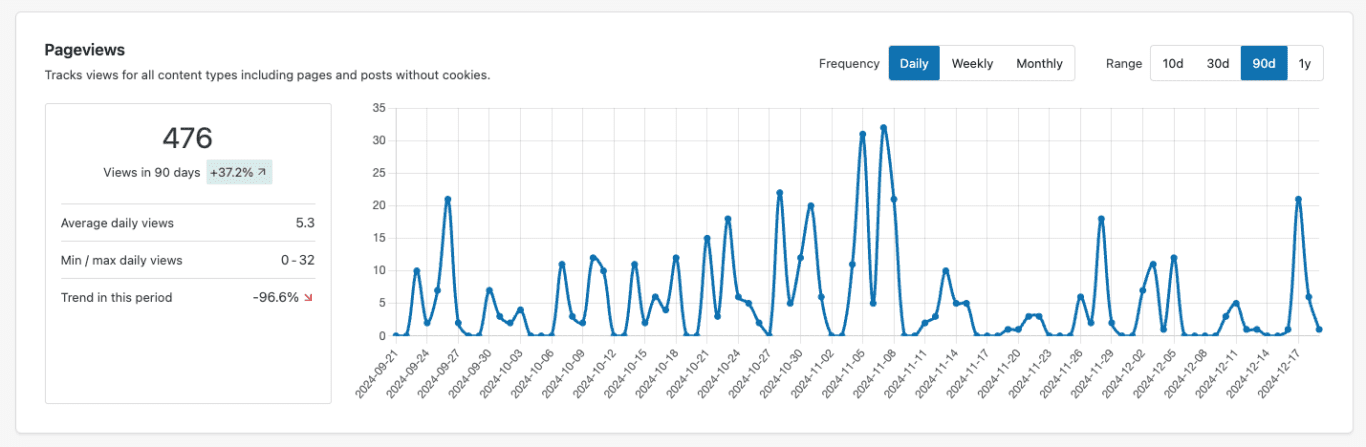
Example: The image shows pageviews from the past 90 days on a daily level. The green bar indicates that pageviews have increased compared to the previous 90 days. Average daily views shows that the site’s pageviews have been 5.3 per day on average. Min / max daily views reveals that during the 90-day period, pageviews ranged from 0 to 32. Meanwhile, Trend in this period indicates that the number of pageviews within these 90 days has been declining.
Page-Specific Analytics
In the page-specific analytics view, you can examine the performance of an individual page. Similar to site analytics, it also displays various metrics and their changes over a selected time period.
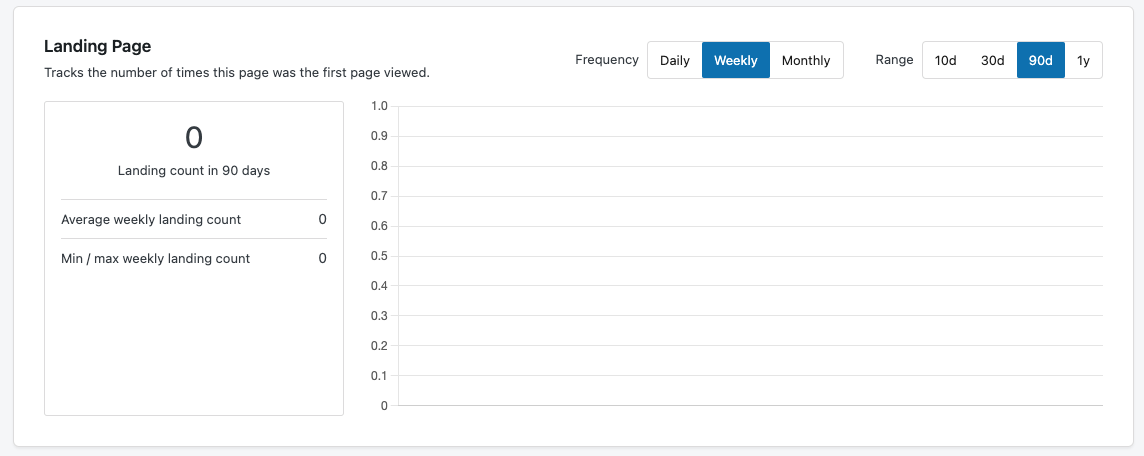
The following metrics can be analyzed on a page-specific level: pageviews, engaged count, average engagement time, and landing page. The landing page metric indicates how many times the page has served as a landing page during the selected time period.
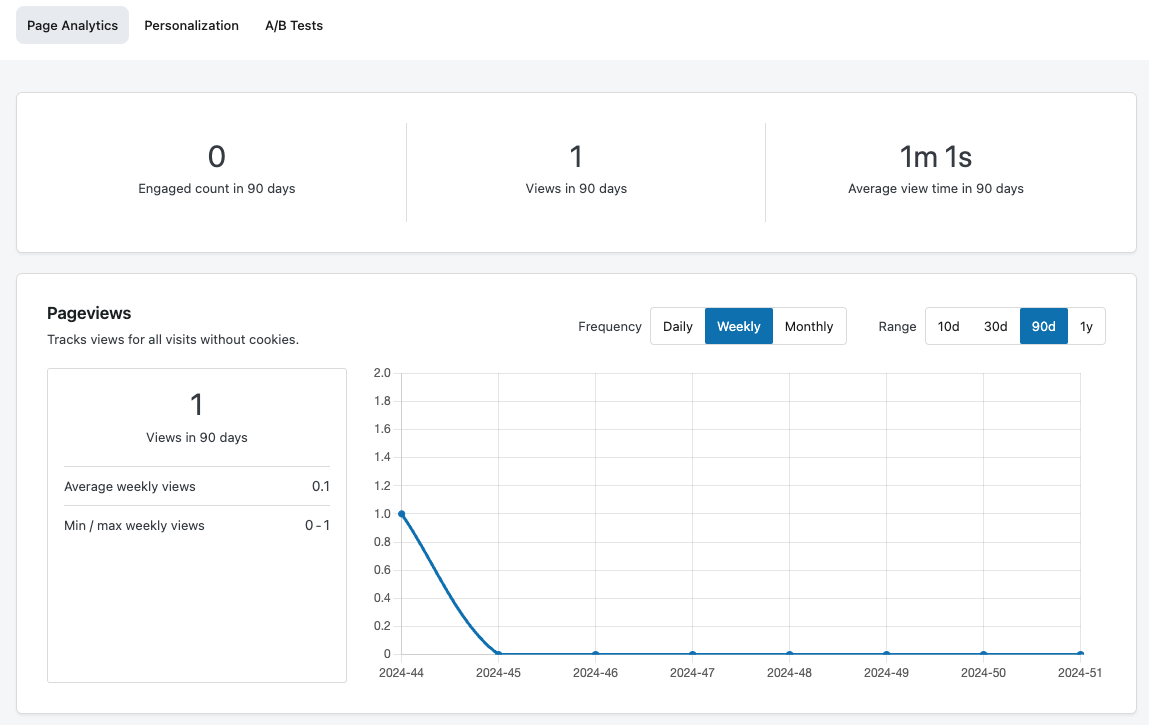
Under page-specific analytics, you can also view the analytics for A/B tests and personalizations on the page.

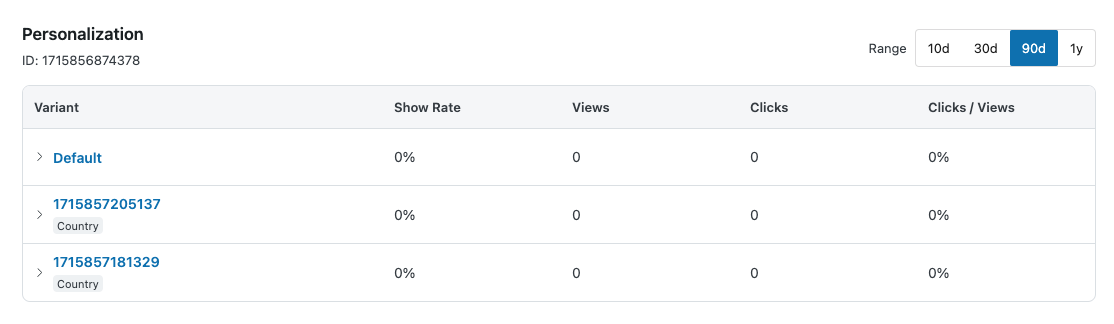
Personalization analytics
In page-specific analytics, you can also view the analytics for personalizations made on the page. Personalizations applied to the page are displayed as a list by their ID, and for each personalization, the variants are listed below the ID.
In the list view, you can examine the following details for each variant:
Show rate – The percentage of visitors who saw that specific variant.
Views – The number of times the variant was viewed on the page.
Clicks – The number of clicks that occurred in that specific variant.
Clicks / Views – The percentage of clicks from the views of each variant.
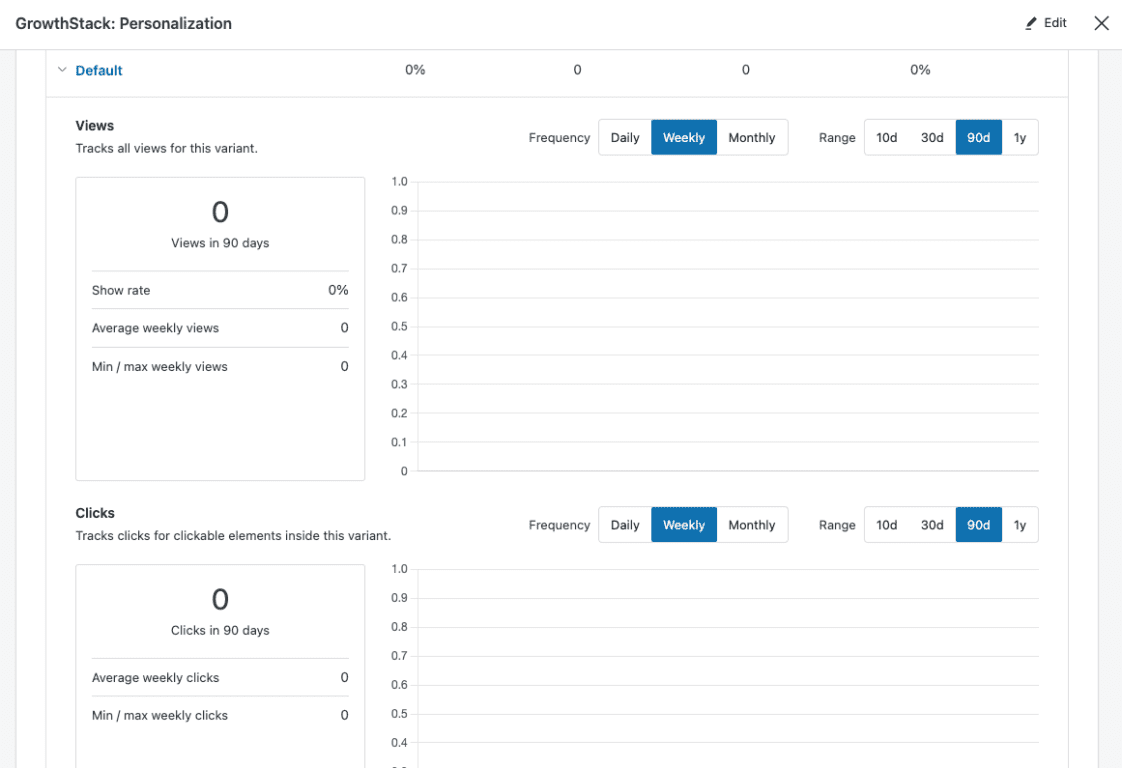
By opening an individual variant, you can view more detailed analytics for it, similar to the site-wide and page-specific analytics. The metrics available for personalizations are Views and Clicks within the selected time period.
A/B testing analytics
The analytics for an active A/B test can be viewed under page-specific analytics for the desired time period, just like personalizations. You can also see how long the test has been running.
The metrics available for A/B tests are:
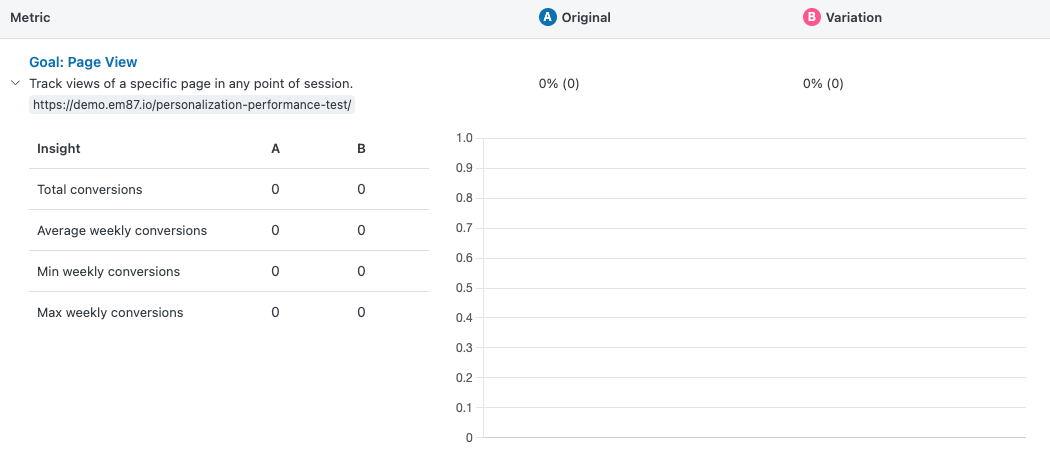
Goal: Page View – If the test has a page-specific goal set, its results for each variation are displayed here.
Engaged Count – The number of engaged visits on the page per variant.
Average Engagement Time – The average time spent on the page per variant.
Pageview – Total pageviews per variant. This is not recommended for comparison, as the variants are shown to visitors in a 50/50 ratio.
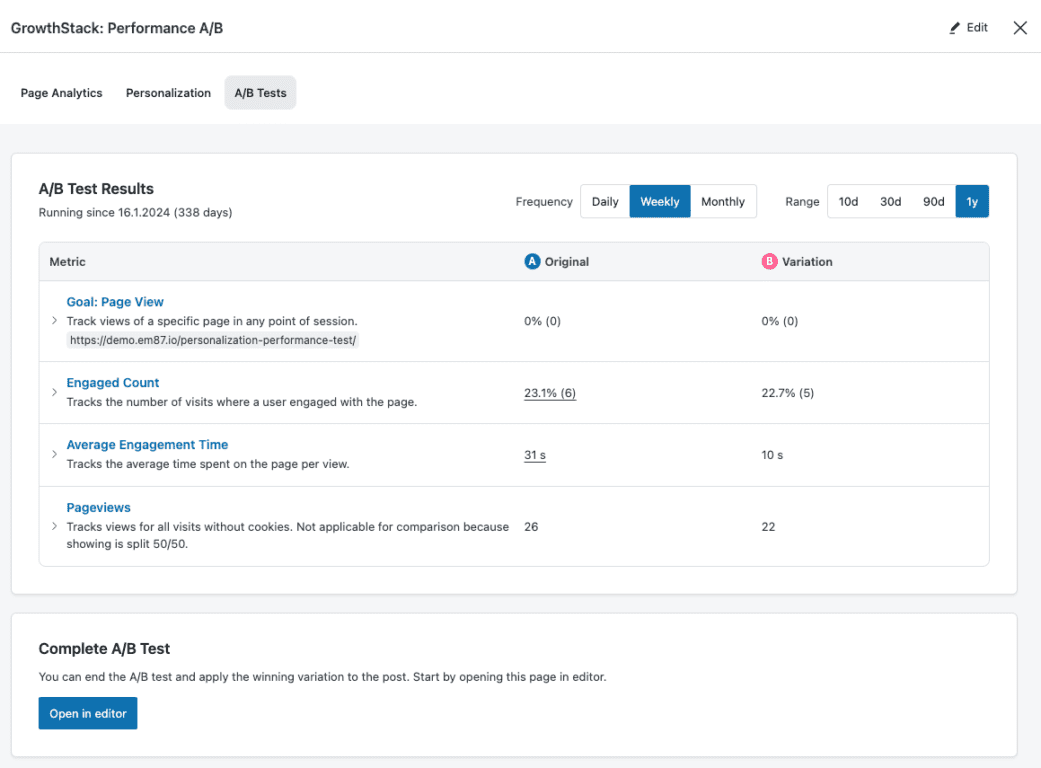
By opening different metrics, you can view more detailed figures, such as the total amount, weekly average, and minimum and maximum values.
The analytics view also provides a direct shortcut to the page editor, allowing you to end an active A/B test if needed.

AI Assistant
The AI Assistant helps to create and edit content directly in the WordPress editor using OpenAI.
Content editing with AI Assistant
You can easily edit the content with the help of AI Assistant by selecting the text in the text editor. When the text is selected, AI Assistant will show up in the editing menu.

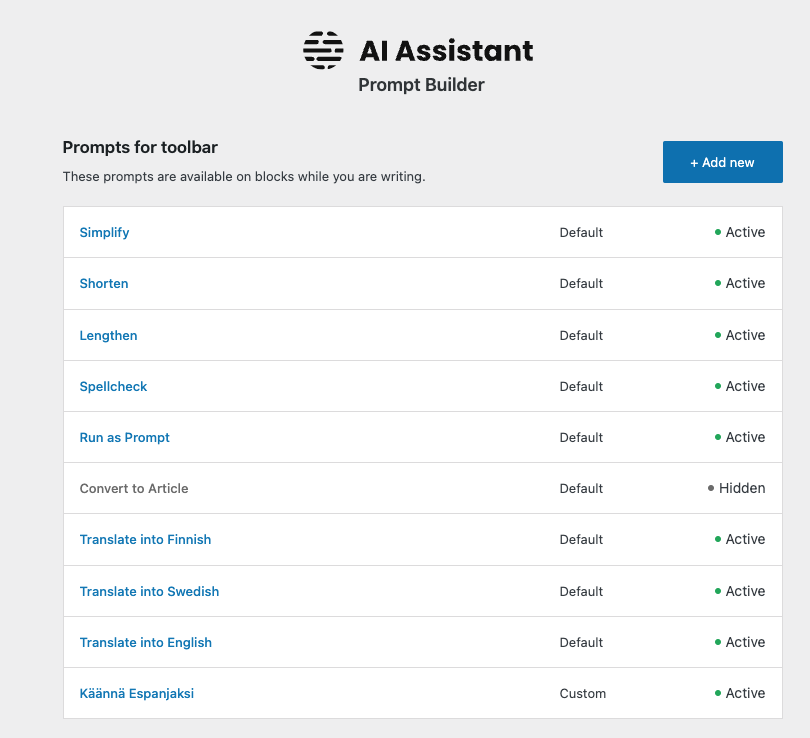
You can edit the text with various default prompts. You can:
- Simplify text
- Shorten text
- Lengthen text
- Check spelling
- Convert bullet points to an article
- Run custom prompts
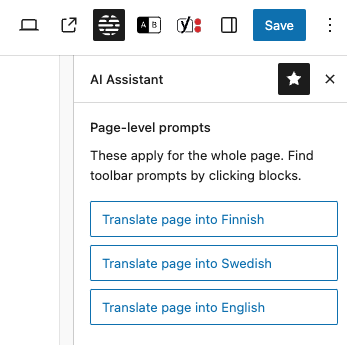
- Translate text into several languages (e.g. Finnish, Swedish, English, German, French, Italy)
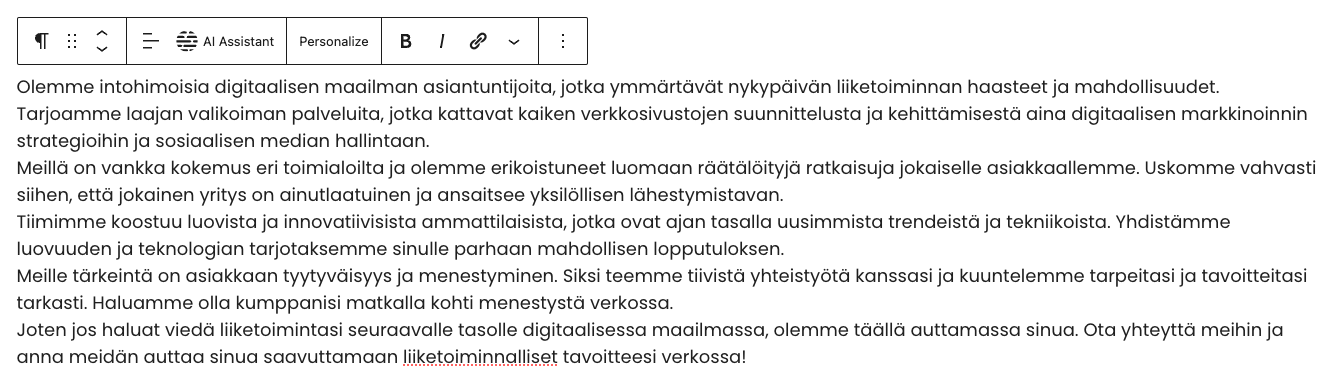
In this example image the original text has been lengthened with the help of AI Assistant.
AI Assistant can also be used when creating and editing content for personalization and A/B tests.
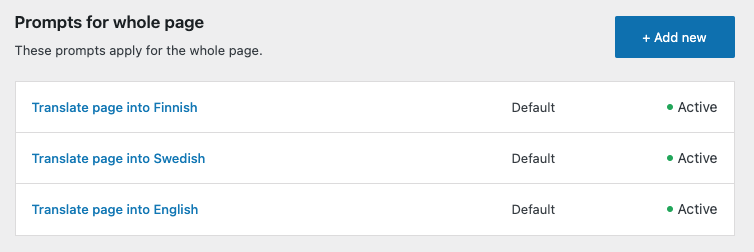
In addition to single blocks, you can also use prompts for editing the content of entire page. Prompts that can be used on a page can be found from the top-right menu under AI Assistant icon.
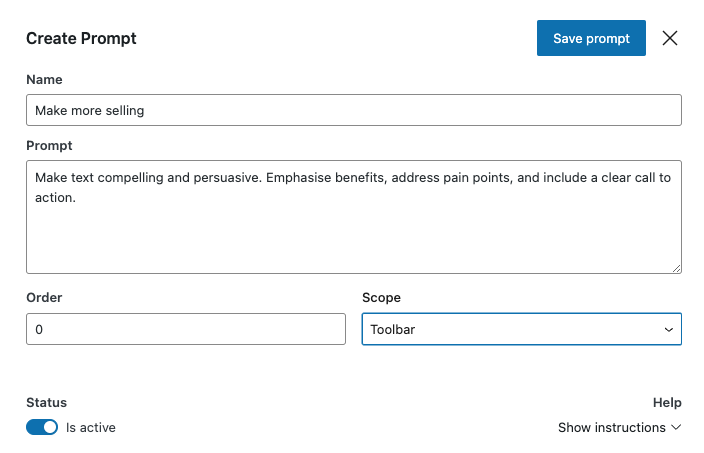
Customizing AI prompts
The AI Assistant includes a few default prompts designed to assist with content editing. However, these prompts can be customized to better suit individual needs through the AI Assistant’s own menu, which is located in the sidebar, similar to GrowthStack.
With custom prompts, you can for example specify:
- Tone of voice
- Length and formatting
- Language
- Target audience
- Goals
- Background information
- Constraints on what not to write about
With the Prompt Builder, it is also possible to create new prompts across the entire site.
New custom prompt can be created by clicking the Add new button.